Defining New Datastores
Defining New Datastores
#390030
New datastores can be planned and managed through the Plan Datastores screen. Through this screen, you can add new datastores, e.g. for a new project that is starting in a few months or for an over-provisioned environment. Once new datastores are added, the capacity for that hosting venue is available immediately for new workloads, starting at the Planned Date when the datastore is planned to be provisioned. Results are visible through:
- Route and Reserve Demand page—so that you can define and route new workloads with that new capacity after the Planned Date (see
- Executive Summary Report—so that you can view the new capacity after the Planned Date (see
- Forecast Report—so that you can view the new capacity details after the Planned Date (see
When creating a new datastore, a set amount of mandatory information needs to be entered including the expected name, the hosting venue, the planned date and model/sizing information. Once a datastore has been added, only its name can be updated.
To begin defining your planned datastores, navigate to the Plan and Manage Supply page and click on the Plan Datastores link. Click Add. The Add Datastore Supply dialog box is displayed. Define your datastores, section by section as described below. After you click on Save, the new planned datastores are added to the displayed list (with booking type "Add"). At this point, you can only edit the Datastore Name.
Step 1: Defining Datastore's Detail
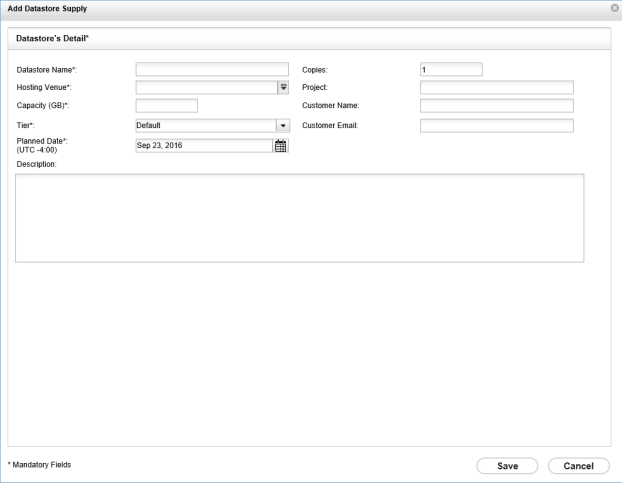
Table: Fields in the Datastore's Detail Section
|
Field |
Description |
|---|---|
|
Datastore Name* |
The expected datastore name. |
|
Hosting Venue* |
The hosting venues to share this datastore. This field provides a dropdown list of all the hosting venues eligible for datastores (i.e. those already defined with existing datastores). The list also respects the hosting venues scope defined by the global filter (see Once the hosting venues are selected, this field shows the selected hosting venues separated by comma "<environment name> - <hosting venue name>,<hosting venue name>,<hosting venue name>...". |
|
Capacity (GB)* |
The size in GB of the datastore. |
|
Tier* |
The name of the storage tier that this datastore should belong. The Default definition is selected, by default. To define other tier definitions, contact your Cloud Advisor. |
|
Planned Date* |
The date the datastore is expected to be running and available for placing VMs. This date is based on the Densify server’s time zone, which is shown with a GMT offset, e.g. "(UTC -4:00)". The calendar picker shows the date based on the Densify server’s time zone. The earliest date is tomorrow's date, i.e. the datastore must be provisioned today ready for placing VMs tomorrow. |
|
Copies |
Enter the number of copies, to create multiple copies of the same datastore. The Datastore Name is appended by a counter, e.g. if Datastore Name is "ds" and you enter 3, then three datastore records are created as "ds1", "ds2" and "ds3". Note: Although you can create up to 999 datastores at one time, Densify will require significant processing time if you create more than 100 copies. |
|
Project |
Enter the project name or application that this datastore is associated with. |
|
Customer Name |
Add the name of the datastore owner. |
|
Customer Email |
Enter the email for the person who requested the new datastore. |
|
Description |
Enter an optional description. |
Step 2: Confirming the Datastore Placement
You can see these new datastore bookings when you move the timeline after the date when the corresponding datastores are planned to come online. An analytics refresh is first required to incorporate the bookings into the environment. See
These new datastore bookings are now available for new workloads having later planned start dates. See
Listing Planned Datastores
The Plan Datastores of the Plan and Manage Supply page provides a list of planned datastores. If the datastore is not provisioned by the planned date, the planned datastore expires and is removed from the list.
The Plan Datastores list is filtered according to the global filter. See
Changing the Datastore Name
Often the name of the planned datastore changes and you need to edit it, so that the incoming datastore can be reconciled during the analysis refresh.
You can select and Edit one datastore at a time, to change its expected name. The update is reflected in the displayed list of datastores.
No other fields are editable.
Canceling Planned Datastores
If you need to cancel any of the new planned datastores, e.g. the project is downsized or canceled, you can select multiple datastores in the list and click on Delete. The available capacity is immediately adjusted and the datastores are removed from the displayed list.
Copying a New Planned Datastore
You can copy an existing planned datastore, by selecting it in the list and clicking on Copy. Change fields as needed. The new datastores are added to the displayed list.